
For cautious Montreal parents, the key takeaway is that fluoride varnish is exceptionally safe due to its targeted application, with the real question being not about safety, but about personalized necessity.
- The amount of fluoride is minuscule and adheres directly to teeth, minimizing what can be swallowed.
- Effectiveness is not one-size-fits-all; its frequency should be based on your child’s specific cavity risk profile.
Recommendation: Use this guide to have an informed discussion with your pediatric dentist about a risk-based prevention strategy tailored to your child’s needs, rather than accepting a blanket recommendation.
As a parent in Montreal, you prioritize your child’s health with a thoughtful, evidence-based approach. So, when the pediatric dentist suggests fluoride varnish, a flood of questions is natural. You hear that it prevents cavities, but a persistent concern lingers: what if my toddler swallows it? In a world where we are increasingly conscious of chemical exposures and strive for natural wellness, introducing any substance into a small child’s body warrants careful consideration.
The common refrain is that it’s a standard, safe, and effective procedure. While true, this simple assurance often fails to address the core of a cautious parent’s concern. You aren’t just looking for a “yes” or “no”; you’re seeking to understand the ‘why’ and ‘how’. The fear isn’t just about the varnish itself, but about the principle of exposure and the desire to make the most informed, least interventive choice for your child’s long-term well-being.
This guide moves beyond the platitudes. We will not simply tell you it’s safe. Instead, we will empower you by exploring the precise science behind how fluoride varnish works at a microscopic level. We’ll dismantle the one-size-fits-all approach by examining risk-based treatment plans, offer practical strategies for sensory-sensitive children, and weigh it against alternatives. The goal is to transform your concern into confidence, equipping you to be an active, knowledgeable partner in your child’s dental health journey.
This article provides an in-depth exploration of the key questions parents have about fluoride varnish. By understanding each aspect of the treatment, from the underlying science to the practical post-care steps, you can make a decision that feels right for your family and your child’s specific situation.
Summary: A Parent’s Guide to Fluoride Varnish Safety and Efficacy
- How Does Fluoride Remineralize Teeth at a Microscopic Level?
- Does Every Child Need Fluoride Every 6 Months?
- How to Apply Varnish on a Child Who Hates Strange Textures?
- Fluoride vs. Nano-Hydroxyapatite: Which Is Better for School-Aged Kids?
- Why Can’t Your Child Eat Hot Food for 4 Hours After Varnish?
- Are Dental Sealants Worth the Cost for Children’s Permanent Molars?
- Can You Heal a Cavity at Home Before It Needs a Filling?
- Fluoride vs. Nano-Hydroxyapatite: Making the Right Choice for Your Child
How Does Fluoride Remineralize Teeth at a Microscopic Level?
To understand the safety and efficacy of fluoride varnish, we first need to look at the constant, invisible battle happening on your child’s teeth. This process involves two key actions: demineralization and remineralization. When your child eats sugary or acidic foods, bacteria in the mouth produce acids that strip minerals like calcium and phosphate from the tooth’s enamel surface. This is demineralization, the first step toward a cavity.
Fortunately, the body has a natural defense mechanism. Saliva is rich in calcium and phosphate, and it constantly works to replenish these lost minerals, rebuilding the enamel. This is remineralization. A cavity forms only when the rate of demineralization consistently outpaces remineralization. Fluoride acts as a powerful catalyst in this process. When present, it doesn’t just help replace the lost minerals; it combines with them to form a new, stronger crystal structure called fluorapatite.
Fluoride varnish works by painting a highly concentrated, sticky dose of fluoride directly onto the teeth. This creates a temporary reservoir of fluoride ions. For several hours after application, this reservoir continuously releases fluoride into the immediate environment of the tooth, supercharging the natural remineralization process. It enhances the attraction of calcium and phosphate from saliva to the enamel surface, effectively rebuilding areas that have been weakened by acid. This new, fluorapatite-fortified enamel is significantly more resistant to future acid attacks, stopping the decay process in its tracks before a visible cavity can form.
Does Every Child Need Fluoride Every 6 Months?
The “every six months” guideline is a common starting point, but it’s not a universal mandate. The modern, evidence-based approach championed by pediatric safety advocates is risk-based personalization. Not every child has the same risk of developing cavities, so not every child requires the same prevention strategy. A dentist will assess several factors to determine your child’s specific risk level.
These factors include their history of cavities, the presence of fluoride in your municipal water supply (as is the case in parts of the Montreal area), their diet, and their oral hygiene habits. A child with an excellent diet, no history of cavities, and who drinks fluoridated water may be at low risk. Conversely, a child with previous fillings, a high-sugar diet, or developmental challenges that make brushing difficult is considered high risk. The devastating impact of decay in high-risk populations is clear; a five-year study showed that targeted fluoride varnish programs led to a 92% reduction in the need for dental surgery under general anesthesia.
This risk assessment directly informs the recommended frequency of fluoride varnish application. According to the American Academy of Pediatrics, treatments can be applied two to four times per year, with the final number depending on this personalized risk profile. The goal is to provide the optimal level of protection without unnecessary intervention.
The following table, based on clinical guidelines, illustrates how this risk-based approach works in practice. It empowers you to understand where your child might fall and have a more productive conversation with your dentist.
| Risk Level | Frequency | Factors |
|---|---|---|
| High Risk | Every 3 months | Previous cavities, no fluoridated water, high sugar diet |
| Moderate Risk | Every 6 months | Some dietary risks, regular dental care |
| Low Risk | Once per year | Fluoridated water, good oral hygiene, healthy diet |
How to Apply Varnish on a Child Who Hates Strange Textures?
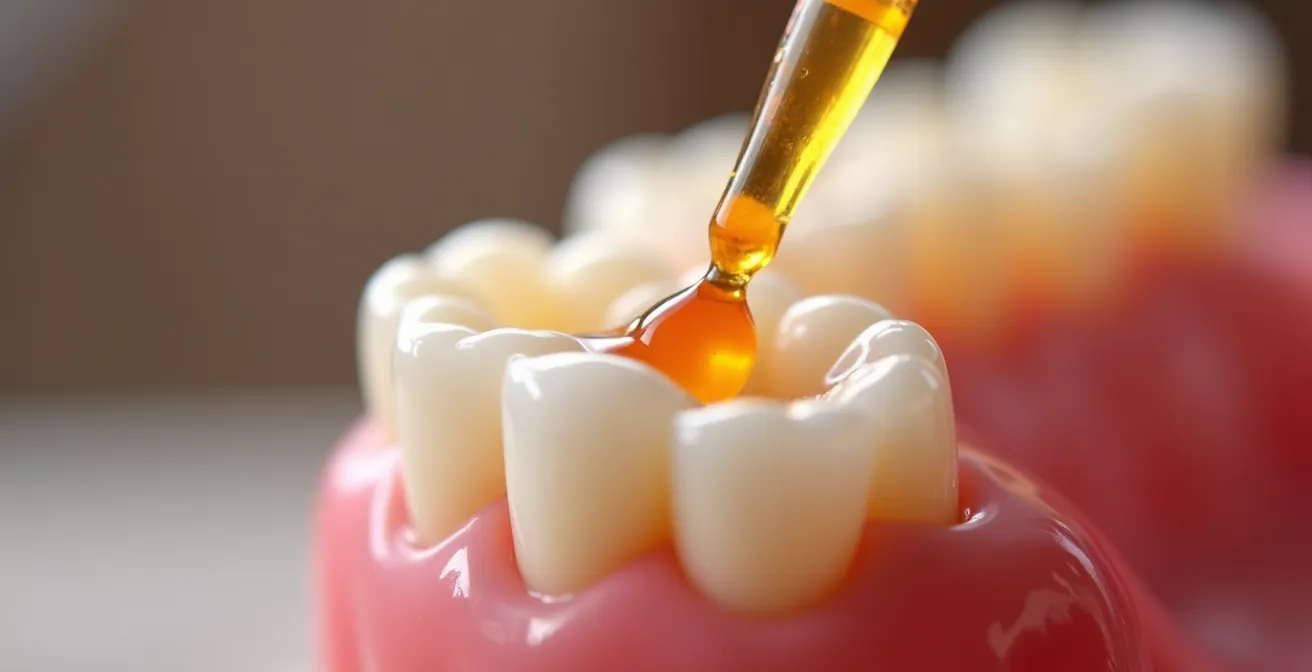
For a parent of a child with sensory sensitivities, the thought of applying a “sticky” varnish inside their mouth can be daunting. The good news is that pediatric dentists are well-versed in these challenges and employ several strategies to make the experience as smooth and quick as possible. The primary concern—swallowing—is minimal because the varnish is designed to be very adhesive, clinging to teeth on contact rather than pooling in the mouth.
The varnish itself has a honey-like or resinous consistency, and the application is gentle, done with a small, soft brush. It’s painted on quickly, often taking less than a minute for the entire mouth. The image below shows a close-up of this texture as it’s applied, highlighting how it coats the tooth surface.
To help a child who dislikes strange textures, preparation and technique are key. Dentists often use a “knee-to-knee” position where the child lies in the parent’s lap, creating a sense of security. Beyond the clinical setting, there are several things you can do to make the process easier:
- Practice at home: Use a clean finger or a soft brush to apply pleasant, sticky textures like a dab of yogurt, apple sauce, or honey to their teeth. This helps normalize the sensation in a controlled, positive environment.
- Choose a flavour: Most modern varnishes come in child-friendly flavours. Ask your dentist what options are available; finding one your child likes can make a significant difference. Most children, in fact, end up liking the taste.
- Communicate and Distract: Talk to your child about what will happen in simple terms. During the quick application, a favorite song, a story, or a video can provide a welcome distraction.
- Hold them securely: For toddlers, being held in a parent’s lap, often in a knee-to-knee position with the dentist, provides comfort and stability, making the application faster and less stressful.
Remember, the entire process is exceptionally brief. The goal is to make these few minutes as comfortable as possible, and your involvement is a crucial part of that success.
Fluoride vs. Nano-Hydroxyapatite: Which Is Better for School-Aged Kids?
As parents become more ingredient-savvy, alternatives to fluoride are gaining attention. The most prominent of these is nano-hydroxyapatite (nHA). Hydroxyapatite is the primary mineral that naturally makes up our tooth enamel and bone. Nano-hydroxyapatite is a synthetic, microscopic version of this mineral used in some toothpastes. The theory is that these tiny particles can directly “fill in” the microscopic gaps in demineralized enamel, helping to remineralize the tooth.
Proponents of nHA praise it as a “biomimetic” alternative, meaning it mimics a natural biological material. It is non-toxic if swallowed and has shown promise in studies for reducing sensitivity and remineralizing early lesions. For a Montreal parent concerned about chemical exposure, a product based on a substance already in our bodies can sound very appealing. It’s an excellent option for daily home care, especially for those who prefer to avoid fluoride in their toothpaste.
However, when it comes to professional, in-office treatments for preventing cavities in school-aged children, fluoride—specifically fluoride varnish—remains the undisputed gold standard. The body of evidence supporting fluoride’s efficacy, built over decades of research, is vast and conclusive. In contrast, while promising, the research on nHA is newer and less extensive, particularly for high-concentration professional applications. For this reason, leading public health bodies continue to recommend fluoride. As the primary authority on dental health in Canada, the Canadian Dental Association’s position is a key piece of evidence for parents.
The Canadian Dental Association (CDA) explicitly outlines its stance, providing a clear, evidence-based recommendation for clinical practice:
The CDA recommends professional fluoride treatment (e.g., gels, 5% sodium fluoride varnish, 38% silver diamine fluoride).
– Canadian Dental Association, CDA Position on Fluoride
This doesn’t mean nHA has no place. It can be a valuable part of a home-care routine. But for a high-impact, professionally applied preventive treatment, fluoride varnish is the most proven tool currently available to protect your child’s teeth.
Why Can’t Your Child Eat Hot Food for 4 Hours After Varnish?
The post-treatment instructions can sometimes cause confusion. Your child can eat and drink immediately after the varnish is applied, but with specific limitations: no hot foods or liquids, and nothing hard or crunchy for at least 4-6 hours. This isn’t for safety, but for efficacy. The fluoride varnish is a sticky, resin-based material that needs time to fully absorb into the enamel and deliver its therapeutic dose of fluoride.
Think of it like painting a wall. The varnish is “tacky” at first. Hot temperatures can soften the resin, making it less effective and causing it to be wiped away before it has done its job. Similarly, hard or abrasive foods (like crusty bread, apples, or crackers) can physically scrape the varnish off the tooth surface. The goal of the 4-6 hour window is to maximize the contact time between the fluoride and the enamel, allowing for the best possible remineralization.
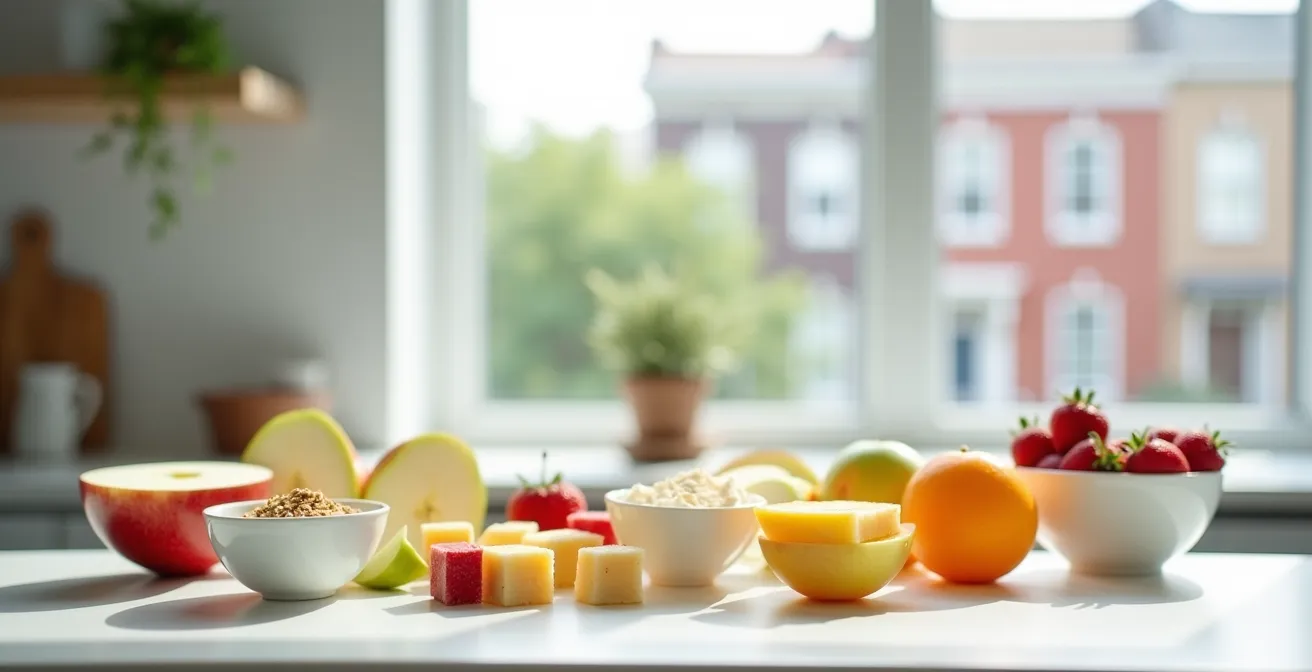
So, what can your child eat? The focus should be on soft, cool, or lukewarm options. This is a perfect opportunity for some healthy and fun snacks. Things like yogurt, smoothies, pudding, soft cheeses, pasta, and mashed bananas are all excellent choices. The image below showcases a variety of child-friendly snacks that are perfect for the hours following a fluoride treatment, with the familiar backdrop of Montreal architecture.
In addition to diet, you will also be told not to brush or floss your child’s teeth until the next morning. This again is to avoid prematurely scrubbing off the varnish. You might notice the teeth look slightly yellow or feel “fuzzy”—this is normal and is just the varnish. It will brush away easily the next day, leaving behind a stronger, more protected enamel surface.
Your Post-Varnish Action Plan: Key Points to Follow
- Dietary Choices: Stick to soft foods and cold or warm (not hot) liquids for the first 4-6 hours. Plan ahead with items like yogurt, smoothies, or soft pasta.
- Brushing & Flossing: Do not brush or floss your child’s teeth for at least 4 to 6 hours. Your dentist may even recommend waiting until the next morning.
- Rinsing Technique: When your child does rinse their mouth (for example, after a meal), remind them to spit if they are old enough to know how.
- Appearance Check: Don’t be concerned if the teeth appear slightly discoloured or feel coated. This is the varnish at work and is temporary.
- The Next Morning: Resume normal brushing and flossing. The varnish coating will come off, having delivered its protective benefits.
Are Dental Sealants Worth the Cost for Children’s Permanent Molars?
When discussing cavity prevention for children, dental sealants are often mentioned alongside fluoride varnish. While both are highly effective, they serve different primary purposes and are not mutually exclusive. Understanding their differences is key to evaluating their cost and benefit for your child, particularly for those crucial permanent molars.
A dental sealant is a thin, plastic coating painted into the deep pits and fissures on the chewing surfaces of molars. These grooves are notoriously difficult to clean with a toothbrush, making them prime locations for bacteria and food to get trapped and cause decay. The sealant acts as a physical barrier, “sealing out” plaque and acid. Fluoride varnish, in contrast, is a chemical treatment that strengthens all enamel surfaces against acid attack. A sealant protects one specific, vulnerable area for years, while varnish provides a whole-mouth boost for months.
From a cost-benefit perspective in Montreal, both are wise investments in preventing more complex and expensive procedures like fillings or crowns down the road. The Winnipeg study, for example, found that a consistent fluoride varnish program resulted in an average cost saving of approximately $822.98 per child over five years compared to usual care. While sealants have an upfront cost per tooth, they can last for up to 10 years, making them highly cost-effective for protecting the most cavity-prone teeth during the most cavity-prone years.
The following table provides a clear comparison to help you discuss the options with your dentist:
| Feature | Fluoride Varnish | Dental Sealants |
|---|---|---|
| Application | Takes only a few minutes | 10-15 minutes per tooth |
| Coverage | All tooth surfaces | Molar pits and fissures only |
| Duration | 3-6 months | 5-10 years |
| Cost (Montreal) | Often covered by insurance | $50-80 per tooth |
| Age Range | From first tooth eruption | Permanent molars (6+ years) |
Can You Heal a Cavity at Home Before It Needs a Filling?
The idea of reversing a cavity at home is incredibly appealing. The answer to this question is a nuanced “yes, but only at the very earliest stage.” What can be “healed” is not a hole in the tooth, but rather an “incipient lesion” or “white spot lesion.” This is the first visible sign of demineralization, where the enamel has weakened and lost minerals but the surface is still intact. This is the critical window of opportunity for remineralization.
As explained by a detailed review on the topic, demineralization is reversible if the oral environment’s pH is neutralized and there are sufficient calcium and phosphate ions available. This allows the rebuilding of the partly dissolved enamel crystals. This process of remineralization can be significantly enhanced by treatments like fluoride varnish, which not only aids in rebuilding but also makes the new enamel more resistant to future acid challenges. So, yes, you can halt and reverse the decay process at this white spot stage.
However, it is crucial to have realistic expectations. Once the demineralization progresses and the enamel surface breaks down to form an actual hole—what we typically call a cavity—it cannot be “healed” or regrown at home. At that point, the structural damage is permanent and requires a filling to restore the tooth’s shape and function and to prevent the decay from advancing deeper into the tooth.
Furthermore, even for reversing incipient lesions, fluoride varnish is not a silver bullet. The American Academy of Pediatrics wisely cautions that prevention is a holistic effort. As they state, fluoride treatments are most effective when combined with consistent brushing with the right amount of fluoride toothpaste, regular flossing, professional dental care, and a healthy, low-sugar diet. It is the combination of these factors that shifts the balance from demineralization to remineralization and truly protects your child’s smile.
Key Takeaways
- Fluoride varnish is safe for toddlers because the sticky formula adheres to teeth instantly, drastically minimizing the amount that can be swallowed.
- The need for fluoride is not one-size-fits-all; frequency should be personalized based on your child’s specific cavity risk, diet, and water source.
- Fluoride works by acting as a catalyst, supercharging the body’s natural remineralization process to build stronger, more acid-resistant enamel.
Fluoride vs. Nano-Hydroxyapatite: Making the Right Choice for Your Child
You’ve seen the science, you understand the risk factors, and you’ve compared the leading ingredients. Now, how do you synthesize all this information to make the best choice for your child in a Montreal dental office? The decision between relying on professional fluoride treatments and exploring nano-hydroxyapatite (nHA) for home care isn’t about one being “good” and the other “bad.” It’s about understanding their optimal roles in a comprehensive prevention strategy.
The first step is a frank conversation with your pediatric dentist. Use the knowledge you’ve gained here to ask targeted questions. Don’t just ask, “Is this safe?” Ask, “Based on my child’s dental history and our lifestyle, what is their specific cavity risk level? How do you see a professional treatment like fluoride varnish fitting into a broader prevention plan for them?” This reframes the conversation from a passive acceptance of a procedure to an active partnership in your child’s health.
For most families, the evidence-based path will involve a hybrid approach. This means utilizing the unparalleled, clinically-proven efficacy of professional fluoride varnish applications at a frequency determined by your child’s risk profile. This is your high-impact intervention. At the same time, you can choose a daily toothpaste that aligns with your family’s philosophy. If you prefer to minimize daily fluoride exposure, a high-quality nHA toothpaste can be an excellent choice for at-home remineralization and cleaning.
Ultimately, making the right choice is about embracing the principle of informed consent. You are the advocate for your child. By understanding that fluoride varnish has an excellent safety profile and remains the gold standard for professional prevention in Canada, you can feel confident in that choice. By knowing that effective alternatives like nHA exist for daily care, you have the flexibility to tailor your home routine. The power lies not in choosing one over the other, but in using each tool wisely.
The next logical step is to schedule a visit with your pediatric dentist. Armed with this information, you are now prepared to have a collaborative discussion and create a personalized cavity prevention plan that gives you and your child every reason to smile.