Contrary to the “gold standard” myth, the best cleaning method is the one you’ll actually use consistently.
- For complex dental work like implants, a water flosser is not just an alternative, but often a superior tool for cleaning hard-to-reach areas.
- Practical technique and the right pressure settings eliminate common complaints like mess and discomfort, making it a sustainable daily habit.
Recommendation: If you hate string floss, give yourself permission to switch. A water flosser is a powerful, dentist-approved tool that prioritizes consistent, practical hygiene over perfect but neglected routines.
Let’s be honest. You probably hate string flossing. You know you’re supposed to do it, your dentist reminds you every six months, but the process feels like a chore. The awkward angles, the snapped string, the guilt when you skip it for the third night in a row—it’s a frustrating cycle. For years, the dental world has held string floss as the untouchable “gold standard,” leaving many feeling like they’re failing at a basic part of their health routine.
The common advice is often a compromise: use a water flosser for “extra” cleaning around braces or implants, but never as a replacement. This advice, however, overlooks a fundamental human truth. The best health habit is not the one that’s theoretically perfect; it’s the one you can stick with day after day. This is where the concept of consistency over perfection becomes a revolutionary act in oral care. What if the real goal isn’t to master a technique you despise, but to find an effective tool you’ll actually enjoy using?
This guide abandons the guilt trip. We’re going to explore the pragmatic truth about water flossers, specifically for those who are ready for a better, more sustainable routine. We’ll examine how its hydro-kinetic action provides superior cleaning in specific situations, how to master its use without redecorating your bathroom, and what the real-world costs and benefits look like, all through the lens of a Montreal resident. It’s time to find a solution that works for you, not one that works against you.
This article dives into the practical realities of switching from traditional floss to a water flosser. Explore the key considerations below to make an informed decision for your oral health.
Summary: Your practical guide to water flossing vs. string floss
- Why water flossing is superior for cleaning under implant bridges?
- How to use a water flosser without spraying the bathroom mirror?
- Can you put mouthwash in your water flosser for double impact?
- Low vs. high: When does water pressure become dangerous to gums?
- Can you safely use a water flosser to dislodge tonsil stones?
- How does “one-visit dentistry” actually work in Montreal clinics?
- Is a $200 sonic toothbrush really better than a $5 manual one?
- Why water flossing is superior for cleaning under implant bridges?
Why water flossing is superior for cleaning under implant bridges?
For anyone with complex dental work like implant-supported bridges, the daily cleaning challenge is real. String floss struggles to navigate the tight, fixed space between the bridge and the gumline, often shredding or failing to reach the most critical areas. This is not a failure on your part; it’s a limitation of the tool. A water flosser, however, excels precisely where string fails. It doesn’t rely on manual dexterity to scrape surfaces but uses hydro-kinetic cleaning—a powerful, pulsating stream of water—to flush out food particles and disrupt plaque biofilm from areas that are otherwise inaccessible.
This method is particularly crucial for the longevity of high-tech restorations. In Montreal, many clinics utilize advanced systems like CEREC for same-day crowns and bridges. These restorations are a significant investment, and their lifespan depends heavily on meticulous care. The area where the restoration meets the gum, known as the gingival margin, is a hotspot for plaque accumulation. A water flosser can target this margin with precision, keeping the supporting gums healthy and protecting the foundation of the implant.
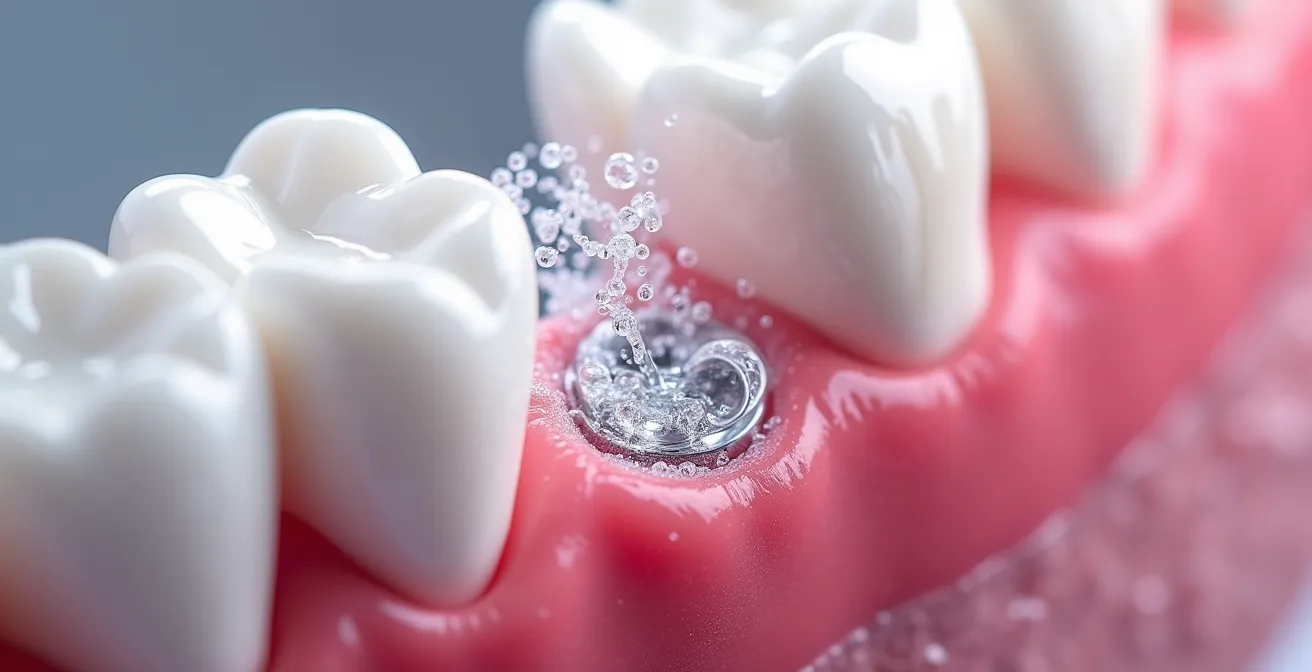
As the image above illustrates, the water jet can penetrate and clean the small gap beneath a bridge, a task that is nearly impossible with traditional floss. According to maintenance protocols for these advanced restorations, effective cleaning around this margin is paramount. As local Montreal dentists guide patients, proper care can make CEREC crowns last well over a decade, and the water flosser is a key tool in that maintenance arsenal. It transforms a frustrating task into an effective, efficient daily habit.
How to use a water flosser without spraying the bathroom mirror?
The number one reason people give up on a water flosser is the initial mess. A vision of spraying the mirror, the counter, and everything in between is a powerful deterrent. But like any tool, there’s a right way to use it that is clean, efficient, and simple. The key is to stop thinking of it as an external hose and start thinking of it as an internal cleaning tool. The water should go from the tip, around your teeth, and straight down into the sink.
The trick is posture and mouth position. Instead of standing upright and looking at the mirror, you need to lean far over the sink and let gravity do the work. By keeping your lips loosely closed around the flosser tip, you create a contained environment. This allows the water to flow out of your mouth and directly into the drain without splashing. Montrealers have a slight built-in advantage here. As KWC Dental in Montreal notes, the city’s notoriously soft water prevents mineral buildup in the nozzle, ensuring a predictable stream that is easier to control than in hard-water regions.
Mastering this mess-free technique turns the water flosser from a potential bathroom disaster into a quick, two-minute part of your routine. It’s a small adjustment that unlocks the full, consistent benefit of the device.
Your checklist for a mess-free water flossing routine
- Prep the Reservoir: Fill the reservoir with lukewarm water. Using cold water can be a shock to sensitive teeth and gums, making the experience unpleasant.
- Choose Your Tip & Lean In: Select the standard tip for general use. Lean your head far over the sink and place the tip in your mouth *before* turning the device on.
- Position and Seal: Aim the tip at a 90-degree angle to your gumline. Gently close your lips around the tip to create a seal that prevents splashing.
- Power On & Trace: Turn on the power. Guide the tip along your gumline, pausing briefly between each tooth to allow the water to flush the area completely.
- Maintain Stability: For added precision, gently brace the hand holding the flosser against your chin or cheek. This “3-point contact” prevents slips and ensures the jet stays focused.
Can you put mouthwash in your water flosser for double impact?
It’s a logical question: if a water flosser is good and mouthwash is good, can you combine them for even better results? The answer is a qualified “yes,” but it’s crucial to know what you can and cannot add to your device. Using the wrong additive can not only be ineffective but can also damage the internal seals and pump of your water flosser. The goal is to deliver a therapeutic agent below the gumline, not just to get a fresh taste.
Generally, any mouthwash containing alcohol or essential oils is off-limits. These ingredients can degrade the plastic components over time. However, certain therapeutic rinses are safe and effective when used correctly. A clinical education course by Waterpik confirms that diluted concentrations of CHX (chlorhexidine) are safe and effective for antimicrobial delivery when used in a water flosser. This is a prescription-level rinse your dentist might recommend for specific gum issues.
For over-the-counter options, a non-alcoholic, CPC-based mouthwash (Cetylpyridinium Chloride) can be used if diluted with water. A simple lukewarm saline solution is also very safe and can be soothing for irritated gums. The most important rule is to always flush the system by running a full reservoir of plain water through the device after using any additive. This prevents residue buildup and prolongs the life of your flosser.
| Additive Type | Safety Level | Effect on Device | Clinical Benefit |
|---|---|---|---|
| Diluted CHX (0.06%) | Safe | No damage when rinsed | Antimicrobial delivery below gumline |
| Non-alcoholic CPC mouthwash | Safe with dilution | Minimal impact | Subgingival bacterial reduction |
| Essential oils/Alcohol-based | Unsafe | Degrades seals and pump | Surface benefit only |
| Lukewarm saline solution | Very safe | No damage | Gentle tissue healing |
Low vs. high: When does water pressure become dangerous to gums?
The idea of a high-pressure water jet aimed at your gums can sound intimidating. Concerns about causing damage, pushing gums back, or causing bleeding are valid. However, modern water flossers are designed with safety and customizability in mind. The key is understanding that “high pressure” is a relative term, and you are in complete control. It’s not about blasting your gums; it’s about finding the lowest effective pressure for your specific needs.
Leading water flosser models available in Canada offer a wide range of settings, typically with 10 customizable settings providing a 30-120 PSI pressure range. This allows for a highly personalized approach. Far from being dangerous, the pulsating action is often gentler on sensitive or receding gums than forcing string floss into tight spaces. The “start low and go slow” principle is paramount. If you’re a new user or have sensitive gums, begin at the lowest setting and only increase it if you feel comfortable and see a need for more power.
Different situations call for different pressure levels. Here’s a practical guide to follow:
- Low Settings (30-50 PSI): This is your starting point. It’s also ideal for sensitive areas, use after recent dental work like a gum graft, or for delivering therapeutic rinses.
- Medium Settings (50-80 PSI): This is the workhorse range for daily maintenance and managing mild gingivitis. It’s effective at removing debris and disrupting plaque without being aggressive.
- High Settings (80-120 PSI): This range should be used with caution. It’s primarily for dislodging stubborn food particles or navigating complex orthodontics, where brackets and wires create extra traps for debris. It is generally not needed for everyday cleaning.
Ultimately, water pressure becomes dangerous only when used improperly. By listening to your body and using the lowest effective setting, you can ensure a safe, comfortable, and highly effective cleaning experience every day.
Can you safely use a water flosser to dislodge tonsil stones?
The internet is full of “life hacks,” and using a water flosser to remove tonsil stones (tonsilloliths) is a popular one. While it might seem like a clever off-label use, it is extremely risky and is strongly discouraged without direct medical consultation. Your tonsils are not teeth; they are delicate, cratered lymphoid tissues. Aiming a pressurized water stream at them can cause serious harm, including lacerations, bleeding, or pushing the stone deeper into the tonsillar crypts, which can worsen the problem or lead to infection.
The gag reflex is another significant concern, as an involuntary reaction could cause the flosser tip to injure the soft tissues at the back of your throat. This is a procedure that requires a delicate touch and a clear understanding of the anatomy, which is why it should be left to a medical professional. Before ever attempting this, you must consult with a Montreal-based ENT (Ear, Nose, and Throat) specialist who can properly assess your situation and recommend a safe removal method.
This sentiment is echoed by healthcare professionals and students alike. As one McGill University dental student noted in a published case study, it is essential to seek proper medical consultation before using dental devices for non-dental purposes. The oral cavity is complex, and what is safe for hard enamel can be dangerous for soft tissue. The “better done than perfect” philosophy applies to sustainable habits, not to risky medical procedures. When it comes to your tonsils, the only pragmatic approach is to seek expert medical advice.
How does “one-visit dentistry” actually work in Montreal clinics?
The idea of getting a permanent dental crown in a single afternoon sounds like science fiction, but it’s a reality in many modern Montreal dental clinics. This technology is most commonly known by the brand name CEREC, which stands for Chairside Economical Restoration of Esthetic Ceramics. It completely eliminates the traditional, multi-week process involving messy impressions, temporary crowns, and follow-up appointments. For the patient, it means less time in the dental chair and a faster return to normal life.
The process is a marriage of digital scanning, computer-aided design (CAD), and on-site manufacturing (CAM). Instead of a goopy impression tray, the dentist uses a small intraoral camera to take a highly accurate 3D digital scan of your prepared tooth. This digital model is then used to design a perfectly fitting crown on a computer right in the treatment room. Once the design is finalized, it’s sent to an in-office milling machine that carves the crown out of a solid block of high-quality ceramic in about 15-20 minutes. The dentist then bonds the permanent crown to your tooth, and you walk out with your final restoration on the same day.
Case Study: The CEREC Workflow at a Downtown Montreal Clinic
At Comfort Care Dental Clinic in downtown Montreal, the one-visit crown process is a streamlined part of their practice. After preparing the damaged tooth, they use a state-of-the-art scanner to create a discomfort-free digital impression. This model is immediately used to design and mill the final crown right in their office. This not only saves the patient a return trip but also allows for precise adjustments on the spot. Because the technology requires months of specialized training, not all practices offer it. Having this in-house expertise allows clinics like Comfort Care to deliver high-quality, convenient restorations that fit perfectly into the busy lives of their patients.
This technology is a prime example of how the dental field is evolving to be more patient-centric, prioritizing both clinical excellence and convenience. It’s another tool that, like the water flosser, makes modern, effective dental care more accessible and less of a chore.
Is a $200 sonic toothbrush really better than a $5 manual one?
This is a classic debate of tech versus tradition. Is a high-tech, expensive toothbrush genuinely more effective, or is it just a gimmick? The pragmatic answer is this: the sonic toothbrush’s biggest advantage isn’t just its cleaning power, but its ability to enforce good technique and consistency. While a manual brush can be effective when used with perfect form for a full two minutes, very few people actually achieve this day in and day out.
A sonic toothbrush automates good habits. Its high-frequency vibrations (often over 30,000 strokes per minute) do most of the work for you, effectively disrupting plaque with minimal effort. More importantly, most models come with two features that are game-changers for consistency: a built-in two-minute timer and a quadrant pacer. The timer ensures you brush for the dentist-recommended duration, while the pacer prompts you to switch areas every 30 seconds, guaranteeing you clean all four quadrants of your mouth equally. It removes the guesswork and a lot of the human error from the equation.
While the initial cost is higher—a quality sonic brush and water flosser combo can be a significant upfront investment compared to a manual brush and floss from Jean Coutu or Pharmaprix—the value lies in the improved, consistent results. It’s an investment in a system that makes optimal oral hygiene easier to achieve. For someone who struggles with motivation or technique, the guided experience of a sonic toothbrush can be the difference between mediocre cleaning and a noticeably healthier mouth. It’s another pillar of the “better done than perfect” philosophy: use the tool that makes the right way the easy way.
Key takeaways
- The best cleaning tool is the one you use consistently; a water flosser is a superior alternative for those who hate string floss.
- Proper technique (leaning over the sink) and pressure management (starting low) are key to a comfortable and effective experience.
- For complex dental work like implants and bridges, a water flosser’s hydro-kinetic action provides a level of cleaning that string floss cannot match.
Why water flossing is superior for cleaning under implant bridges?
Revisiting the specific case of implant bridges brings the entire argument for water flossing into sharp focus. This isn’t just a matter of preference; it’s about choosing the right tool for a very specific and demanding job. The long-term success of a dental implant relies entirely on the health of the surrounding gum and bone tissue. If plaque is allowed to accumulate under the bridge, it can lead to peri-implantitis—an inflammatory condition similar to gum disease that can cause bone loss and, ultimately, implant failure.
From a practical standpoint, a water flosser is simply a more effective risk-management tool. A patient who struggles with string floss is likely to either skip cleaning under their bridge or do it ineffectively. A water flosser, once the basic technique is mastered, provides a reliable and thorough cleaning every single time. It turns a point of failure into a point of strength in your oral hygiene routine. It provides peace of mind that you are protecting your significant investment and your health.
In a city like Montreal, where access to advanced dental solutions like same-day CEREC bridges is common, adopting equally modern maintenance tools is a logical step. The philosophy of using technology to achieve better, more consistent outcomes connects both the restoration and its aftercare. Embracing a water flosser is a pragmatic decision to ensure that your state-of-the-art dental work is supported by a state-of-the-art daily hygiene practice. It’s the final piece of the puzzle for long-term oral health.
Your daily oral hygiene routine shouldn’t be a source of frustration. By choosing the tools that you will use consistently and effectively, you take control of your health. The next logical step is to discuss these options with your dental professional to find the perfect fit for your needs and lifestyle.
Frequently asked questions about Water Flosser vs. String Floss: Which One Is the Truth?
Is it safe to use a water flosser on tonsils?
This is an off-label use that requires medical consultation. Tonsils are delicate lymphoid tissue, not teeth. Consult a Montreal-based ENT specialist before attempting.
What are the specific risks?
Risks include pushing the stone deeper into crypts, causing tissue laceration, inducing gag reflex, or triggering infection.
If medically approved, what’s the safest approach?
Use absolute lowest pressure setting, aim adjacent to (not directly at) the stone, use lukewarm saline solution, and stop immediately if pain occurs.