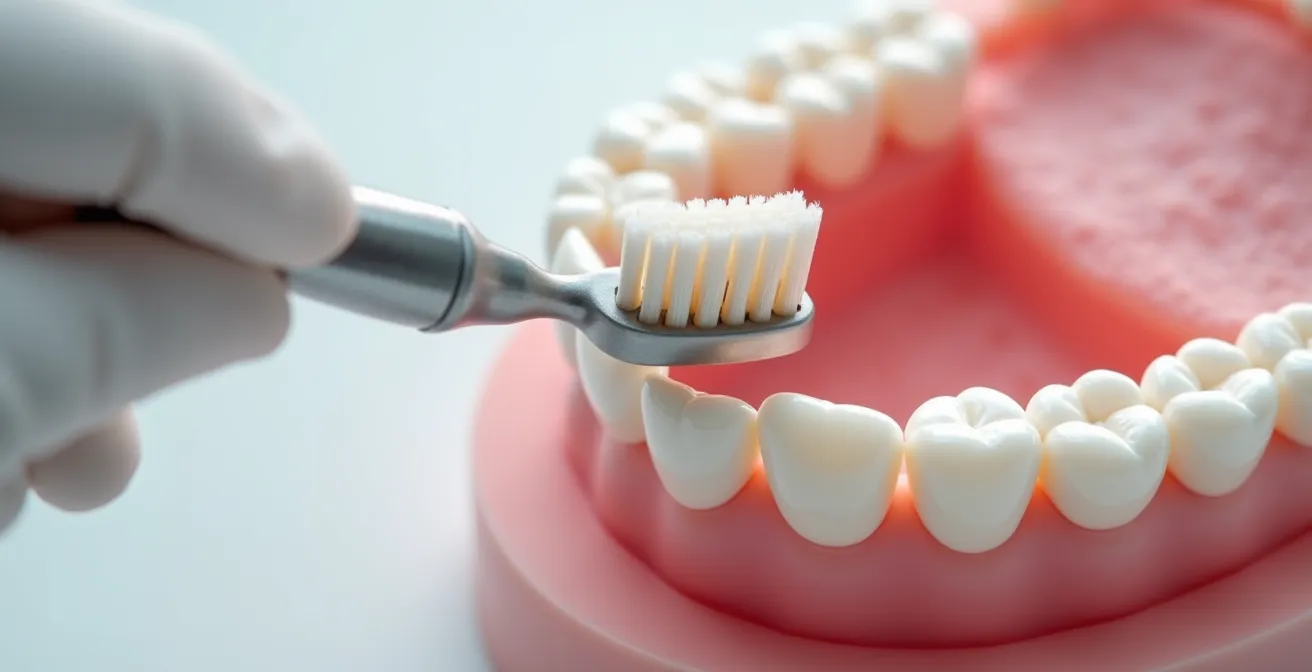
If you brush meticulously but still face gum inflammation, the problem isn’t your diligence—it’s your target. The key to ending gingivitis is cleaning the invisible 1-3 millimeter space below the gumline.
- The sulcular technique requires a precise 45-degree angle to slip bristles into the gum pocket (the sulcus).
- Gentle, micro-vibrations, not aggressive scrubbing, are used to dislodge the destructive plaque biofilm.
Recommendation: Mastering this technique requires shifting your focus from the motion of the brush to the tactile sensation of the bristles working in that critical, hidden zone.
You are diligent. You brush twice a day, you avoid sugary drinks, and you might even floss more often than you admit to your hygienist. Yet, you see that frustrating tinge of pink in the sink when you spit. It’s a common story for many in Montreal: you follow the rules, but your gums are still inflamed, sensitive, or bleeding. The conventional wisdom to “brush more” or “use a soft brush” is well-intentioned but incomplete. It addresses the ‘what’ but misses the crucial ‘where’.
The battle for gum health isn’t fought on the broad, visible surfaces of your teeth. That’s the easy part. The real war is waged in a tiny, unseen trench called the gingival sulcus—the small pocket where the tooth meets the gum. This is where plaque biofilm organizes into a destructive colony, triggering the inflammation known as gingivitis. If you only polish the crowns of your teeth, you are leaving the enemy’s main fortress completely untouched.
But what if the solution wasn’t about more pressure or more time, but more precision? The key is to stop thinking of brushing as a scrubbing motion and start thinking of it as a targeted, tactical cleaning. It’s a shift from brute force to a focus on sensation and technique. This is the essence of sulcular brushing, a method that specifically targets that hidden pocket.
This guide is designed to be your personal technique instructor. We will deconstruct the sulcular brushing method, not as a rigid rule, but as a skill you can feel and master. We’ll cover how to aim the bristles correctly, manage sensitive areas, understand the healing process, and determine which tools are truly worth the investment for your oral health.
To help you master this essential skill, this article breaks down the technique into precise, manageable steps. Follow this guide to understand not just what to do, but how it should feel, ensuring you can finally clean the zone that matters most.
Summary: Mastering the Critical Zone Below Your Gums
- How to Aim Your Bristles Into the Sulcus Without Causing Pain?
- How to Clean Exposed Roots Without Wearing Them Down Further?
- Why You Should Keep Brushing (Gently) Even If It Bleeds?
- Do You Need the Sulcular Technique with a Sonic Toothbrush?
- How Do Healthy Gums Look Different After 2 Weeks of Proper Technique?
- Is a $200 Sonic Toothbrush Really Better Than a $5 Manual One?
- Why Are Your Gums Receding Even Though You Brush Twice a Day?
- How to Aim Your Bristles Into the Sulcus Without Causing Pain?
How to aim your bristles into the sulcus without causing pain?
The secret to effective sulcular brushing is not force, but finesse. The goal is to gently persuade the bristles to slip just under the gumline, not to jab them in. Think of it less like scrubbing a floor and more like a painter using a fine brush to get into a detailed corner. The first step is to adjust your grip. Stop holding your toothbrush with a clenched fist. As local experts advise, this immediately reduces the amount of pressure you can apply.
The Paro Implanto Montreal Brushing Protocol
Here at Montreal’s Paro Implanto clinic, the sulcular brushing technique is considered the best method for superior oral hygiene. They emphasize four key elements for proper control: the grip, the angle, the sequence, and the duration. To achieve this, they coach patients to hold the brush with their fingertips, much like a pencil. In addition to protecting the gums from excessive force, this technique improves dexterity and the efficiency of the cleaning motion.
With a lighter grip, you can now focus on the angle. Position the brush head at a 45-degree angle, pointing the bristles upward for the top teeth and downward for the bottom teeth, directly toward the gumline. This is the single most important step. At this angle, the outermost bristles are perfectly poised to enter the sulcus. Now, instead of a wide sweeping or circular scrub, you apply a gentle vibration. It’s a tiny, localized back-and-forth or wiggling motion. You should feel the bristles massaging the gumline, not scratching it. Hold this micro-vibration for a few seconds on each tooth or pair of teeth before sweeping the brush away from the gums to clear the dislodged plaque biofilm.
This method requires patience. You are cleaning each tooth individually, paying attention to the front, back, and chewing surfaces. It’s a systematic approach, not a race. Mastering this tactile feedback is the key to cleaning the sulcus effectively and, most importantly, painlessly.
Your Action Plan: 4 Steps for Pain-Free Sulcular Brushing
- Angle and Aim: Hold your toothbrush at a 45-degree angle to your gums, ensuring the bristles are pointing directly toward the gumline.
- Engage with Micro-Motions: Use short, back-and-forth or small circular wiggles, allowing the bristle tips to slip gently under the gumline. Avoid any scrubbing pressure.
- Vibrate and Sweep: After a few seconds of gentle vibration on each tooth to dislodge plaque, sweep the bristles away from the gums (down for top teeth, up for bottom teeth) to remove the loosened debris.
- Ensure Full Coverage: Do not just focus on the front of your teeth. Systematically apply this technique to the inside (tongue-side) and chewing surfaces of every tooth, and finish by cleaning your tongue.
How to clean exposed roots without wearing them down further?
If your gums have receded, you are now dealing with exposed root surfaces. This presents a new challenge. Unlike the hard, durable enamel that covers the crown of your tooth, the root surface is covered by cementum, which is much softer and more susceptible to wear. Aggressive brushing on these surfaces can lead to notching (abrasion) and severe sensitivity. Here, the “gentle” part of the sulcular technique becomes non-negotiable. Your primary goal is to remove the plaque biofilm without removing your tooth structure.
The key is to modify the technique slightly. You still want to clean the gumline, but you must be exceptionally careful on the exposed root. For these areas, focus on a “roll” or “sweep” technique. Place the bristles on the gum tissue just above the receded area, angle them toward the root, and gently roll the brush head down over the gum and tooth surface, flicking debris away from the gumline. This minimizes the back-and-forth friction that causes wear.
Using an ultra-soft-bristled toothbrush is mandatory if you have recession. The bristles need to be flexible enough to clean effectively with minimal pressure. This isn’t a place for medium or hard bristles, which will act like sandpaper on the soft root surfaces. The combination of an ultra-soft brush and the roll technique allows you to disrupt plaque without causing further damage.
Think of it as dusting a delicate antique. You want to remove the dust, not the varnish. The same principle applies here. Your touch should be light, and the motion deliberate. By focusing on this gentle, sweeping clean, you can maintain the health of your gums and prevent the progression of both recession and sensitivity, a common concern for many Montrealers dealing with our changing seasons and diets.
Why you should keep brushing (gently) even if it bleeds?
Seeing blood in the sink is an alarming sight, and our natural instinct is to avoid the area that’s bleeding. We think, “I must be hurting my gums, I should let them heal.” This is a critical mistake. Bleeding is not a sign of injury from brushing; it’s a symptom of inflammation caused by plaque. Your gums are bleeding because the bacteria in the plaque biofilm have triggered an immune response. The tissue is swollen, engorged with blood, and fragile. It’s your body’s fire alarm, signaling an active infection.
Avoiding the area is like ignoring a fire alarm and allowing the fire to spread. The only way to stop the bleeding is to remove the source of the problem: the plaque. By gently but thoroughly cleaning the sulcus, you disrupt the bacterial colonies, reduce the inflammation, and allow the gums to heal. It’s a counter-intuitive but essential truth of dental health. If it bleeds, you must clean it better (but more gently!). This is a widespread issue; according to recent Statistics Canada data, 83% of Canadian adults aged 20 to 79 showed some form of gum bleeding, indicating a near-universal need for better cleaning at the gumline.
The Galligan Villa Dental Team, experts in periodontal health, emphasize the importance of this targeted cleaning:
Removing this buildup is essential to prevent inflammation and decay. Cleaning beneath the gumline reduces the risk of gingivitis and more advanced periodontal disease. For those already experiencing mild gum issues, this technique can reverse early signs.
– Galligan Villa Dental Team, The Bass Method (or Sulcular Brushing) Guide
When you first start the sulcular technique correctly, you may even notice a temporary increase in bleeding as you begin to clean previously-neglected areas. Do not be discouraged. This is a sign that you are finally reaching the source of the inflammation. With consistent, gentle, and precise brushing, the bleeding should significantly decrease and often stop completely within one to two weeks as the gums heal and become more resilient.
Do you need the sulcular technique with a sonic toothbrush?
Yes, absolutely. A sonic toothbrush is a powerful tool, but it’s not a magic wand. It doesn’t eliminate the need for proper technique; it amplifies it. Many people mistakenly believe that the high-speed vibrations do all the work, and they can just passively move the brush around their mouth. This leads to the same problem as poor manual brushing: missing the critical sulcus zone. The power of a sonic brush is only unleashed when you direct it to the right location.
The principle of the 45-degree angle remains the same. You must still consciously aim the bristles toward the gumline. However, the motion changes. With a sonic brush, you don’t need to perform the manual micro-vibrations. The brush does that for you, and far faster than you ever could. Your job is to adopt a “hover and hold” method. Position the brush at the correct angle, let the bristles engage the sulcus, and simply hold it in place for a few seconds on each tooth. Then, lift and move to the next tooth. Let the sonic vibrations do the cleaning while you focus entirely on placement.

This partnership between technology and technique is what delivers superior results. The sonic vibrations create fluid dynamics that help disrupt plaque even slightly beyond where the bristles touch, and they are incredibly efficient. In fact, clinical studies demonstrate up to 10% more plaque removal with a sonic toothbrush compared to a manual one when used correctly. But “correctly” is the operative word. Without aiming at the sulcus, you’re just getting a very fast, very expensive polish of your tooth crowns, while the plaque below the gumline continues to thrive.
Think of your sonic toothbrush as a high-performance vehicle. It has incredible potential, but it still needs a skilled driver to steer it where it needs to go. Your role as the “driver” is to guide it precisely along the gumline of every tooth.
How do healthy gums look different after 2 weeks of proper technique?
The transformation can be remarkably fast. When you successfully switch from superficial brushing to a targeted sulcular technique, you are directly addressing the root cause of inflammation. The results are not just a feeling, but are visibly apparent. This quick feedback is incredibly motivating and confirms you’re on the right path. For the many Montrealers who struggle with gum issues, this is welcome news; the Canadian Dental Association reports that roughly 7 in 10 Canadians will develop some form of gum disease in their lifetime, but early stages are often reversible with the right care.
Within the first two weeks of consistent, proper technique, you should notice a clear progression of healing. The changes follow a predictable timeline as the inflammation subsides and the tissue firms up:
- Week 1: The most immediate change is a dramatic reduction in bleeding. The areas that used to bleed with the slightest touch will become more resilient. You’re removing the irritants, and the inflammation is starting to calm down.
- Week 2: You’ll see a noticeable change in color. Inflamed gums are typically red, dark pink, or even purplish, and appear swollen or puffy. As they heal, they will return to a lighter, coral pink color and will look less bloated.
- Week 2-3: As the tissue becomes even healthier, you might start to see the appearance of “stippling.” This is a texture that resembles the surface of an orange peel on the gums attached to the bone. Its presence is a classic sign of excellent gum health.
- Week 3-4: The gum margins, which may have been rounded and rolled when inflamed, will become firm. They will develop sharp, “knife-edged” contours that hug the teeth tightly, forming a perfect seal against new bacterial invasion.
Ultimately, healthy gums don’t bleed, they are firm and pink, and they create a tight collar around the base of each tooth. Achieving this state is not a matter of luck; it’s a direct result of effective plaque removal in the sulcus. Watching this transformation happen in your own mouth is the best confirmation that your new technique is working.
Is a $200 sonic toothbrush really better than a $5 manual one?
This is a central question for anyone serious about jejich oral health. Is the significant price difference justified by performance, or is it just marketing? The answer is nuanced: a sonic toothbrush is a superior tool, but its value is entirely dependent on the user. A perfectly wielded $5 manual brush is far more effective than a poorly used $200 sonic brush. However, when technique is consistent, the technology does provide a measurable advantage.
The primary difference lies in efficiency and the margin for error. A manual brush’s effectiveness is 100% reliant on your ability to generate the correct micro-vibrations. A sonic brush automates this crucial motion, allowing you to focus solely on placement. This automation is incredibly powerful. As one meta-analysis concludes, the difference is statistically significant.
High-frequency, high-amplitude sonic powered toothbrushes decreased plaque and gingivitis significantly more effectively than manual toothbrushes in everyday use in studies lasting up to three months.
– Meta-Analysis Research Team, The Effectiveness of Manual versus High-Frequency Sonic Toothbrushes Meta-Analysis
To make a practical decision, it’s helpful to break down the factors beyond just the initial price tag, as this cost-benefit analysis for Quebecers shows.
| Factor | $5 Manual Brush | $200 Sonic Brush |
|---|---|---|
| Initial Cost | $5 | $200 |
| Replacement Frequency | Every 3 months ($20/year) | Brush heads every 3 months ($40/year) |
| Plaque Removal Efficiency | Baseline | Up to 52% better than manual |
| Brush Strokes Per Minute | 300 (manual effort) | 30,000+ (automatic) |
| Learning Curve | Requires proper technique mastery | Amplifies even imperfect technique |
| Additional Features | None | Timer, pressure sensor, multiple modes |
For a diligent person who has already mastered the sulcular technique, a sonic brush acts as an upgrade, making the process faster and more thorough. For someone who struggles with the manual dexterity of the micro-vibration motion, a sonic brush can be a game-changer, as it provides the “perfect” motion every time. Features like a two-minute timer and a pressure sensor also act as invaluable coaches, preventing you from brushing too hard and ensuring you brush long enough. So, is it better? Yes, but it’s a tool that enhances skill, not a substitute for it.
Why are your gums receding even though you brush twice a day?
Gum recession in a diligent brusher is a profoundly frustrating paradox. If you’re cleaning your teeth regularly, why would your gums be pulling away? While the most common cause is aggressive, horizontal scrubbing with a hard-bristled toothbrush, there are other, more subtle culprits at play. If you’ve already switched to a soft brush and a gentle technique, you need to look deeper. The problem might not even be happening when you’re awake.
One of the most significant and often overlooked causes of gum recession is bruxism—the unconscious grinding or clenching of your teeth, typically at night. This habit places immense, sustained, and unnatural forces on your teeth. This pressure is transferred down to the bone and ligaments that support the teeth. Over time, this chronic stress can cause the thin bone over the tooth roots to break down, and the gum tissue, having lost its underlying support, follows suit and recedes. You can have perfect oral hygiene, but if you’re grinding your teeth for hours every night, you’re subjecting your gums to a destructive force that no amount of brushing can fix.
Case Study: Bruxism as a Hidden Cause of Recession
Dental professionals in Montreal, like those at Smile Montreal, frequently encounter patients with recession linked to bruxism. The grinding motions place extreme stress on the temporomandibular joint (TMJ) and the teeth. One of the primary treatments to mitigate this damage is a custom-fitted night guard. This mouthpiece, worn during sleep, prevents the upper and lower teeth from making direct contact, absorbing the grinding forces and dramatically reducing the stress on both the teeth and the jaw joint, thereby helping to halt the progression of recession.
Another factor is the existing anatomy and tooth position. If a tooth is tilted or pushed outward in the dental arch, the plate of bone on its outer surface can be paper-thin or even absent. This area is extremely vulnerable, and even normal brushing can be enough to trigger recession. This is why Statistics Canada data reveals a worrying trend: over one-third of Canadian adults had deeper periodontal pockets (a sign of attachment loss) in recent years, a significant increase from a decade prior. Ultimately, if your recession persists despite gentle hygiene, it’s crucial to consult a dentist in Montreal to investigate these other factors like your bite and the possibility of bruxism.
Key Takeaways
- The most critical area for your gum health is the sulcus, the 1-3mm pocket between your tooth and gum, which is missed by standard brushing.
- Effective cleaning requires the sulcular technique: a 45-degree angle to the gumline and gentle, micro-vibrations, not aggressive scrubbing.
- Bleeding is a sign of inflammation that needs to be addressed with gentler, more precise cleaning, not avoidance.
How to master the sulcular technique and eliminate pain?
You’ve learned the theory: the 45-degree angle, the gentle pressure, the focus on the sulcus. Now, it’s time to transition from mechanically following steps to achieving true mastery. This final stage is about calibration and proprioception—learning to feel, with precision, what the bristles are doing. This is how you eliminate discomfort переговоры and maximize effectiveness, turning the technique into a second-nature habit.
The most common source of pain or failure with this technique is a miscalibration of pressure and motion. Remember the pencil grip? It’s your primary safety mechanism. If your knuckles are white, you are pressing too hard. The goal is to use just enough pressure for the outer row of bristles to flex and slip into the sulcus. You should feel a soft tickle or gentle massage, not a sharp poking. If you feel pain, your pressure is too high, or your angle is too steep, causing the bristles to stab the gums rather than slide alongside them.
Practice in front of a mirror. Watch the bristles as you apply pressure. See how they splay out. You want just a slight flex. Once you have the feel, try it with your eyes closed. Focus entirely on the sensation. Can you feel the difference between the hard enamel of the tooth crown and the soft margin of the gum? Can you feel the bristles engaging that tiny pocket? This is “proprioceptive brushing”—guiding your movements by feel, not by sight or force. This sensory feedback is your ultimate coach, telling you when you’re on target. It’s a skill that, once learned, makes brushing more effective than it has ever been.
Your journey to perfect gum health starts tonight. Pick up your toothbrush, adopt the pencil grip, and begin the practice of precision. For a truly fresh start, consider scheduling a professional cleaning with your local Montreal dental hygienist to remove any hardened calculus, giving you a clean slate to maintain with your new, perfected technique.